How to create Custom VPC in Amazon AWS
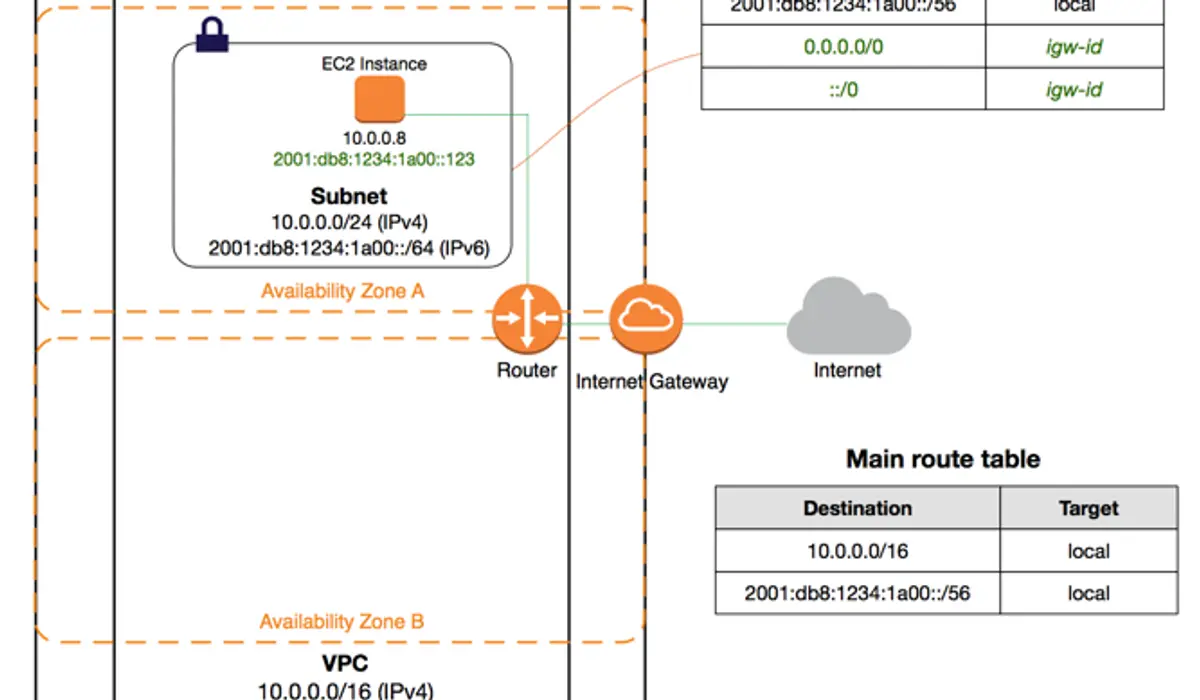
In this tutorial, we will create a VPC with an IPv6 CIDR block, a subnet with an IPv6 CIDR block, and finally to launch a public-facing instance into our subnet. This is a part of our tutorial series, How to set up multiple elastic ip for Amazon EC2 Instance.
Our instance will be able to communicate with the Internet over IPv6, and you'll be able to access instance over IPv6 from the local computer using SSH (if it's a Linux instance) or Remote Desktop (if it's a Windows instance). We will be covering the Linux instance in this tutorial.
Steps to create custom VPC in Amazon AWS
- Create a nondefault VPC with an IPv6 CIDR block.
- Create a subnet with an /24 IPv4 CIDR block and a /64 IPv6 CIDR block.
- Attach an Internet gateway to the VPC.
- Create a custom route table, and associates it with subnet.

Sign in to your Amazon AWS account and navigate to VPC console.
Please take note of the region in which you'll be creating the VPC. and make sure that you continue working in the same region for the rest of this exercise, as you cannot launch an instance into your VPC from a different region.
Choose VPC dashboard and choose Launch VPC Wizard.

Amazon VPC dashboard
Choose the VPC with a Single Public Subnet, and choose Select.
Now on the configuration page, enter a name for your VPC, for example, custom-vpc, and enter a name for your subnet for Subnet name. This helps you to identify the VPC and subnet in the Amazon VPC console.
For IPv4 CIDR block, you can leave the default setting (10.0.0.0/16), or specify your own.
For IPv6 CIDR block, choose Amazon-provided IPv6 CIDR block.
For Public subnet's IPv4 CIDR, leave the default setting, or specify your own. For Public subnet's IPv6 CIDR, choose Specify a custom IPv6 CIDR. You can leave the default hexadecimal pair value for the IPv6 subnet (00).
Leave the rest of the default configurations on the page, and choose Create VPC.
A status window shows the work in progress. When the work completes, choose OK to close the status window.
The Your VPCs page displays your default VPC and the VPC that you just created.
Creating a subnet with an /24 IPv4 CIDR block and a /64 IPv6 CIDR block
Open the Amazon VPC console and choose Subnets, and then choose Create Subnet.
In the Create Subnet section, select the VPC, select the Availability Zone, and specify the IPv4 CIDR block for the subnet (Optional, IPv6 only) For IPv6 CIDR block, choose Specify a custom IPv6 CIDR.
Choose Yes, Create. And finally add newly created subnet to our VPC.
Creating and Attaching an Internet Gateway to the VPC
- Open the Amazon VPC console and navigate to Internet Gateways.
- Choose Create internet gateway.
- Name your internet gateway, and then choose Create.
- Select the internet gateway that you just created, and then choose Actions, Attach to VPC.
- Select your VPC from the list, and then choose Attach.
Creating a Custom Route Table
When you create a subnet, Amazon AWS automatically associate it with the main route table for the VPC. By default, the main route table doesn't contain a route to an internet gateway. We will create a custom route table with a route that sends traffic destined outside the VPC to the internet gateway, and then associates it with our subnet.
Steps to create a custom route table
- Open the Amazon VPC console, navigate to Route Tables.
- Choose Create Route Table.
- Optionally name your route table.
- Select your VPC, and then choose Yes, Create.
- Select the custom route table that you just created. The details pane displays tabs for working with its routes, associations, and route propagation.
- On the Routes tab, choose Edit, Add another route, and add the following routes as necessary. Choose Save when you're done.
- For IPv4 traffic, specify 0.0.0.0/0 in the Destination box, and select the internet gateway ID in the Target list.
- For IPv6 traffic, specify ::/0 in the Destination box, and select the internet gateway ID in the Target list.
- On the Subnet Associations tab, choose Edit, select the Associate check box for the subnet, and then choose Save.
FAQ's
What is a custom Amazon VPC?
Custom Amazon Virtual Private Cloud (Amazon VPC) enables you to launch AWS resources like Amazon EC2, or host your Web Application into a virtual network that you define. You can configure an IP address range for the VPC, add subnets, associate security groups, and configure route tables. This virtual network closely resembles a traditional network that you'd operate in your own data center, with the benefits of using the scalable infrastructure of AWS.
Amazon VPC pricing
Amazon Virtual Private Cloud (Amazon VPC) lets you provision a logically isolated section of the Amazon Web Services (AWS) cloud where you can launch AWS resources in a virtual network that you define. You have complete control over your virtual networking environment, including selection of your own IP address range, creation of subnets, and configuration of route tables and network gateways. You can use both IPv4 and IPv6 in your VPC for secure and easy access to resources and applications.
You can easily customise the network configuration for your Amazon Virtual Private Cloud. For example, you can create a public-facing subnet for your webservers that has access to the Internet, and place your backend systems such as databases or application servers in a private-facing subnet with no Internet access. You can leverage multiple layers of security, including security groups and network access control lists, to help control access to Amazon EC2 instances in each subnet.
Additionally, you can create a Hardware Virtual Private Network (VPN) connection between your corporate datacenter and your VPC and leverage the AWS cloud as an extension of your corporate datacenter.
VPN Connection Pricing
- $0.05 per VPN Connection-hour
- $0.048 per VPN Connection-hour for connections to the Tokyo Region and Osaka-Local Region
- $0.065 per VPN Connection-hour for AWS GovCloud (US) Region
If you choose to create a VPN Connection to your VPC using a Virtual Private Gateway, you are charged for each "VPN Connection-hour" that your VPN connection is provisioned and available. Each partial VPN Connection-hour consumed is billed as a full hour. You also incur standard AWS data transfer charges for all data transferred via the VPN Connection. If you no longer wish to be charged for a VPN Connection, you simply terminate your VPN Connection using the AWS Management Console, command line interface, or API.


