Launch an Amazon AWS Instance with Custom VPC
If you want to launch a Amazon EC2 instance with custom made VPC, Security Group, Internet Gateway, this simple step by step guide will help you in Launching an AWS EC2 Instance.
This step by step guide is a part of our series on How to set up multiple elastic ip for Amazon EC2 Instance.
When you launch an EC2 instance into a VPC, you must specify the subnet in which to launch the instance. In this case, you'll launch an instance into the public subnet of the VPC you created. Use the Amazon EC2 launch wizard in the Amazon EC2 console to launch your instance.
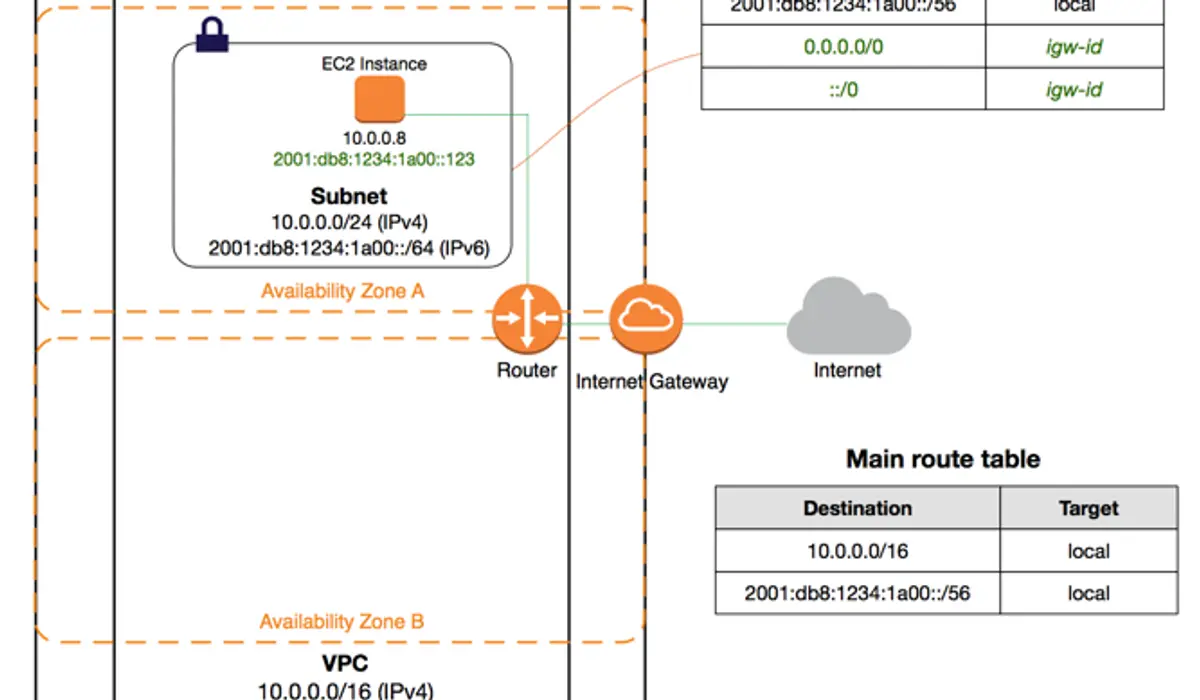
To ensure that your instance is accessible from the Internet, assign an IPv6 address from the subnet range to the instance during launch. This ensures that your instance can communicate with the Internet over IPv6.
The following diagram represents the architecture of your VPC after you've completed this step.

Steps to launch an EC2 instance into a VPC
Note: Select the same region in which you created your VPC and security group.
1. Open the Amazon EC2 Dashboard and navigate to Instance.
2. Click on Launch Instance.
3. Choose an Amazon Machine Image (AMI). For this exercise, we recommend that you choose an Ubuntu Server.
4. Choose an Instance Type page.
We will go the General Purpose t2.micro instance. You can select the hardware configuration and size of the instance to launch. By default, the wizard selects the first available instance type based on the AMI that you selected.
You can leave the default selection and choose Next: Configure Instance Details.
5 . On the Configure Instance Details page, select the VPC that you created from the Network list and the subnet from the Subnet list.
6. For Auto-assign Public IP, choose Enable.
7. For Auto-assign IPv6 IP, choose Enable.
8. Leave the rest of the default settings, and go through the next pages of the wizard until you get to the Add Tags page.
9. On the Add Tags page, you can tag your instance with a Name tag; for example Name=CustomWebServer. This helps you to identify your instance in the Amazon EC2 console after you've launched it. Choose Next: Configure Security Group when you are done.
10. On the Configure Security Group page, the wizard automatically defines the launch-wizard-x security group to allow you to connect to your instance. Instead, choose the Select an existing security group option, select the WebServerSG group that you created previously, and then choose Review and Launch.
11. On the Review Instance Launch page, check the details of your instance and choose Launch.
12. In the Select an existing key pair or create a new key pair dialog box, you can choose an existing key pair, or create a new one. If you create a new key pair, ensure that you download the file and store it in a secure location. You need the contents of the private key to connect to your instance after it's launched.
To launch your instance, select the acknowledgment check box and choose Launch Instances.
13. On the confirmation page, choose View Instances to view your instance on the Instances page. Select your instance, and view its details in the Description tab. The Private IPs field displays the private IPv4 address that's assigned to your instance from the range of IPv4 addresses in your subnet. The IPv6 IPs field displays the IPv6 address that's assigned to your instance from the range of IPv6 addresses in your subnet.
You can connect to your instance through its IPv6 address using SSH or Remote Desktop from your home network. Your local computer must have an IPv6 address and must be configured to use IPv6. For more information about how to connect to a Linux instance, see Connecting to Your Linux Instance in the Amazon EC2 User Guide for Linux Instances.
Also see
Connecting to a running Amazon EC2 instance from ubutnu terminal and Filezilla
Note
If you also want your instance to be accessible via an IPv4 address over the Internet, SSH, or RDP, you must associate an Elastic IP address (a static public IPv4 address) to your instance, and you must adjust your security group rules to allow access over IPv4. For more information, see Getting Started with Amazon VPC.


